Archive
Archive
This document explains how VoltDB works with Kubernetes and Docker to run and manage databases in a virtualized environment. This is not a tutorial on Kubernetes, Docker, or VoltDB. You should be familiar with all three technologies before using this document.
Kubernetes is an orchestration tool for managing applications and services run in containers. It is designed to automate the management of distributed applications, with a particular focus on microservices. VoltDB is not a microservice; there is more interaction between a VoltDB cluster's individual nodes than in most microservices. However, you can still use Kubernetes to run and manage VoltDB clusters.
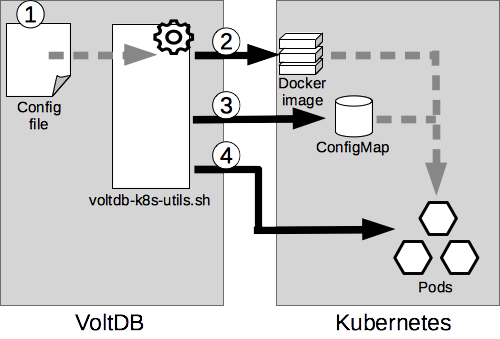
This document describes one approach for running VoltDB in a Kubernetes environment. It is automated by scripts provided in the VoltDB kit starting with VoltDB V8.3.3. The process utilizes four key aspects of Kubernetes:
Docker — A Docker image is created that contains the current installation of the VoltDB server software, plus the scripts necessary to start the server process.
ConfigMaps — Kubernetes ConfigMaps store the artifacts needed to create your database, including the optional schema and stored procedure classes, the configuration file, and the VoltDB license.
Persistent Storage Volumes — The server startup process initializes Kubernetes persistent storage volumes to maintain the ongoing state of the database across database sessions. Specifically, the persistent volumes hold the VoltDB database root directories including the current schema, command logs, snapshots, export overflow, and so on.
Stateful Sets — The configuration of the cluster of Kubernetes pods is defined as a Kubernetes stateful set. You use the stateful set definition to initialize and control the VoltDB cluster. It also allows Kubernetes to restart pods in case the individual nodes fail.
Before starting the process described in this document, make sure your development system and account meet the following requirements:
Installed:
VoltDB 8.3 or later
Kubernetes command line (kubectl) 1.10.4 or later
Docker[1]
Copies of:
Database configuration file and license (if using the Enterprise Edition)
Optionally, the database schema and JAR file containing stored procedure classes
Access to:
Docker registry
Kubernetes hosting environment
In addition to the preceding requirements for your development system, your Kubernetes hosting environment must also have access to the Docker repository you are using (or another repository the compiled Docker image will be copied to) and have the ability to instantiate persistent storage volumes to retain the VoltDB root directories and their contents for when pods are deleted and recreated.
VoltDB, like all memory-intensive applications, is sensitive to base system settings that control access to assets such as memory, CPU, and networking. Memory configuration options such as swapping and Transparent Huge Pages (THP) can dramatically impact the performance of a VoltDB database. In extreme cases, THP can result in unnecessary allocations of memory to the point where the server process runs out of memory. This is why VoltDB recommends turning off THP.
The VoltDB Administrator's Guide contains a chapter on how to prepare a server for optimal use with VoltDB, including disabling THP. However, in a virtualized environment — and particularly when using containers — you do not have direct access to the base system's core settings from within the virtual machine (VM) or container. Therefore, to ensure proper and consistent operation of VoltDB in such environments, you must make the necessary adjustments on the base system itself.
If you are running VMs on hardware you manage, this can be done by configuring the servers yourself. If, on the other hand, you are using a hosted environment, you should consider other alternatives. You can negotiate with the hosting provider to ensure the servers are configured correctly. Alternately, you can use privileged mode VMs (essentially, dedicated servers reserved for your account) and Kubernetes features to modify the base system before any containers are run.
The following are some resources that can help you make the appropriate decision about your configuration choices:
Stack Overflow discussion of using Kubernetes' init-containers and DaemonSets to disable Transparent Huge Pages
Paul Done's blog post on configuring Kubernetes and hosted VMs for running MongoDB
The Kubernetes support in VoltDB uses one main control script
(tools/kubernetes/voltdb-k8s-utils.sh) to perform all of the functions needed to configure, build, and
run VoltDB in a Kubernetes environment. The control script lets you:
Build a Docker image containing the VoltDB software and scripts to facilitate cluster startup in Kubernetes
Create Kubernetes ConfigMaps containing database assets such as the schema, stored procedures, configuration file, and VoltDB license
Start and manage the VoltDB cluster
The basic steps for deploying a VoltDB database in Kubernetes are:
Copy the template Kubernetes configuration file tools/kubernetes/config_template.cfg. Edit
your copy to specify the desired properties for your cluster, such as memory size, CPU count, location of the starting
schema and stored procedure classes and so on. The control script uses this configuration file to personalize all of its
actions.
Create a docker image including your current VoltDB software installation. This is the version of the VoltDB software that will be run in Kubernetes.
Create Kubernetes ConfigMaps containing your database configuration file, schema, stored procedure classes, and license file.
Start and manage your VoltDB cluster using the control script commands.
Figure 1, “Deploying VoltDB in Kubernetes” illustrates the overall process for setting up and running VoltDB in Kubernetes.
The following sections describe each step. See the README file in the Kubernetes directory for details about the properties in the configuration file and the specific commands to perform each step.
The first step is to create a Kubernetes configuration file. You do this by copying the configuration template in
the /tools/kubernetes folder where VoltDB is installed. For example:
$ cd ~/voltdb/tools/kubernetes
$ cp config_template.cfg productDB.cfg
By default, the name of the configuration file is used for all output files, the Docker image, and the Kubernetes cluster itself. Alternately, you can specify a tag name in the configuration file that is used to name the artifacts.
Once you create a copy of the configuration file, edit it to define the properties you want for your database cluster, including deployment attributes and runtime assets such as the schema and procedure classes. The scripts ensure your assets are available to the cluster from Kubernetes ConfigMaps and that they and the software are copied to the appropriate locations during startup.
See the README file in the /tools/kubernetes folder for specifics on what properties you can
set in the configuration file.
The scripts in the Docker image look for an existing database root directory. If they do not find it, they allocate Kubernetes persistent storage and initialize a new root directory. The use of persistent storage means the root directory is preserved, even when individual pods or the cluster as a whole goes down. This supports VoltDB availability features, such as command logging and automated snapshots, that save and restore the database contents across sessions.
Once you edit the configuration file, you can create the Docker image that Kubernetes uses to start the cluster. For example:
$ cd ~/voltdb/tools/kubernetes
$ bash voltdb-k8s-utils.sh -B
The next step is to load the assets needed to configure and start VoltDB into Kubernetes ConfigMaps. These assets may include the VoltDB configuration file, database schema, procedure classes, and license file, as defined by Kubernetes configuration created in Section 2.1, “Creating the Configuration File”. For example:
$ cd ~/voltdb/tools/kubernetes
$ bash voltdb-k8s-utils.sh -M
Finally, you create the definition of the Kubernetes stateful set (that is, the YAML file) and start the cluster
using the -C and -S arguments to the voltdb-k8s-utils.sh
script. For example:
$ cd ~/voltdb/tools/kubernetes
$ bash voltdb-k8s-utils.sh -C
$ bash voltdb-k8s-utils.sh -S
Once the cluster starts, Kubernetes takes care of monitoring and restarting the pods as needed to keep the database
running. The voltdb-k8s-utils.sh script provides other arguments to perform management actions
manually, such as shutting down the cluster and deleting Kubernetes resources. See the README for details.
You can use any number of techniques to monitor VoltDB databases, whether they are being managed by Kubernetes or not. For example, you can use SNMP traps to notify operators about error conditions or apply monitoring tools such as Nagios to integrate VoltDB monitoring with the monitoring of other systems. In addition, Kubernetes adds two monitoring "probes" of its own.
To automate the management of your applications, Kubernetes performs periodic health checks on the pods. The two key Kubernetes health checks, or probes, are liveness and readiness.
Liveness tells Kubernetes whether the pod is still viable and the application is still running. If a pod's liveness probe returns false, Kubernetes will restart the pod in an attempt to return it to normal operation.
Readiness is an indicator of whether the application itself is operating properly. Kubernetes does not automatically restart pods that are not ready. But it does show the readiness state on the dashboard and will not include the pod in certain activities (such as load balancing) if it is not ready.
By default, the VoltDB liveness probe tests to see that the internal port is open, the port the cluster uses to communicate internally. This indicates that the server process is up and running. It does not indicate the operational state on the database itself.
The default readiness probe tests to see if the client port is open, the port client applications use to interact with the database. This indicates that the database itself is running and any startup tasks, such as restoring snapshots or command logs, have been completed.
It should be noted that by default Kubernetes does not allow a pod to expose network ports until the application is "ready". However, VoltDB needs to expose ports to establish the cluster mesh before it can be ready for normal operation. So, VoltDB overrides the default readiness requirement in this respect. This allows the cluster to form, recover existing data, then open the client port before the practical definition of readiness is reported.
There are many different ways to connect to a service within Kubernetes. The simplest approach is to run the client application within the same Kubernetes subnet as the VoltDB cluster itself, for example as a Kubernetes headless service. In this configuration your client application can refer to the VoltDB cluster servers by their hostnames alone.
If your client is running outside of the Kubernetes cluster, you must use a different approach to connecting to the database cluster. The key is to find a persistent IP address that both the client and server agree on as the public Internet interface for the server.
You can open a port on the underlying hardware (NodePort) to the server or establish a separate load balancing service that is accessible externally. But, quite frankly, none of the generic options available in Kubernetes provide reliable performance guarantees without significant customization.
There are essentially two approaches to connecting to a VoltDB database running within a Kubernetes environment:
Opening up an externally accessible port and IP address to which applications connect
Tunneling in to the Kubernetes internal subnet and connecting to the internal IP addresses
Opening up an IP address and port externally to the individual pods in a VoltDB usually involves ephemeral addresses that do not match the addresses the cluster itself knows about or requires significant privileges and special functions within the hosting environment. In almost all cases this means performance optimizations in the client — such as topology awareness and client affinity — cannot operate properly and performance will suffer consequently.
For client affinity and topology awareness to operate properly, the client application needs to have access to IP addresses for each of the nodes in the VoltDB cluster and the cluster needs to be able to advertise those addresses either directly or through the externalinterface option. One reliable way to achieve this is to either run the client application within the same Kubernetes cluster or provide a secure tunnel into the Kubernetes subnet. This approach has several advantages:
It allows the client to connect to the cluster nodes by host name
The host names are persistent and definable
Client features such as topology awareness and client affinity operate properly
This is also true for database replication (DR) and XDCR) where the consumer needs to be able to identify appropriate producer nodes for each partition. Using a private tunnel or other mechanism to have all clusters within a single XDCR relationship running within the same logical subnet significantly reduces the complexity of establishing the necessary network relationship between clusters.
The previous discussion of defining and starting VoltDB in Kubernetes focuses on individual clusters. VoltDB also supports database replication (DR), where data from one database is replicated to another (master/replica), or cross datacenter replication (XDCR) where two or more database clusters are actively processing read and write transactions and sharing the results.
In most cases DR and XDCR are used to connect geographically disparate clusters. In other words, clusters in different Kubernetes instances, regions, or possibly between Kubernetes and completely different hosting environments. In these cases, special consideration needs to be taken about how the distributed clusters establish their connections.
To establish DR between two VoltDB clusters, the nodes of the consumer cluster must be able to create a network connection to the IP addresses of all the producer cluster nodes. In passive DR, this means the replica cluster must be able to resolve the IP addresses of the master cluster. XDCR clusters act as both consumer and producer, so all clusters must be able to resolve the IP addresses of other clusters in the XDCR relationship.
When setting up DR between clusters in different Kubernetes clusters or between Kubernetes and another production environment, it is important that your network topology meets this requirement; for example, by using a virtual private cloud (VPC) , a virtual Local area network (VLAN), or port remapping as described in Section 4, “Connecting to a VoltDB Database in Kubernetes”. Which of these features is available to you and how you instantiate them is dependent on your Kubernetes provider and your agreement with them.
Establishing the DR connection at runtime occurs in two steps:
First, a consumer cluster contacts the producer through a network address specified in the VoltDB configuration
file (using the <dr> and <connection> tags). The producer responds with the list of IP addresses and port
numbers for its nodes.
The first cluster then drops the initial connection and opens connections (one per partition) to nodes on the producer cluster using the list of IP addresses received in step #1.
The IP address used in step #1 needs to be static so it can be defined in the configuration file before the clusters start. On the other hand, the IP addresses Kubernetes assigns to individual pods used in step #2 are temporal and can change.
Fortunately, the addresses used in the configuration file to find the producer cluster and the addresses returned by the producer at runtime do not have to be the same. One way to bridge this difference is to use a Kubernetes load balancer to connect a static IP address to the producer cluster. The consumer cluster can configure its DR connection using the static IP address of the load balancer and then resolve the actual IP addresses returned at runtime using a virtual network.
When using port remapping (rather than VPC or VLANs), it is important that in step #1 the producer cluster responds
the with remapped IP addresses rather than its internal addresses. You can ensure this happens by specifying the remapped
address (and, optionally, port) in the --drpublic argument in the VOLTDB_START_ARGS property of the
Kubernetes configuration file..
Finally, it is important to note that performance of the network dramatically impacts the performance of data replication and VoltDB itself. For best performance, you must use networking resources that can support the peak bandwidth requirements of the replication stream. Hosting services often provide networking features with different performance tiers. Inadequate network bandwidth can result in bottlenecks, backlogs, and ultimately, if not addressed, the DR connection itself may be broken. So use of high bandwidth cross-zone or cross-region networking is recommended when supporting DR.
[1] The required version of Docker is dependent on the version of Kubernetes and the choice of base OS to be used. See the Kubernetes release notes for details.